Photoshop skills: Intermediate
Compatibility: Requires Photoshop CS4 or newer, and PicturesToExe
Create an animated snowglobe using Photoshop and PicturesToExe
Photoshop action by Panos Efstathiadis
Animation files and PDF tutorial by Lin Evans
Photoshop is widely used to produce impressive static images. There are a number of people who go beyond that and integrate PS with other applications to create impressive animated effects.
PicturestoExe (aka PTE, from Wnsoft.com) is a popular application which lets you create amazing animations. There is a vibrant community of PTE users who create great effects (you can check their forums by clicking here).
LIN EVANS is an American animation artist who took my Snowglobe action and programmed an excellent animated effect in PTE. He kindly offered us the necessary files to reproduce his effect with our own images. The whole process is very easy that even non-experienced Photoshop users will get the effect done within a couple of minutes.
For the first snow globe action (Snow globe - Version 1) please read Lin's instructions here
For the second snowglobe action (Snow globe - Version 2) please read the following text:
Here are the steps you need to take:
1. At first you need to download and install PicturesToExe (PTE).
2. Once you install PTE you need to download the necessary files for this effect:
This zip contains 4 files. Please create a folder in your hard disk (anywhere you prefer) and decompress all four files inside this folder.
3. One of these 4 files is called panostest.jpg. This is the flat (non-layered) product of my snow globe action. You will replace this image with your own. The steps which I am briefly discussing below are presented in detail in the PDF tutorial Lin created for us which you can download it here.
3.a Start by running my Snowglobe action (Snow globe - Version 2).
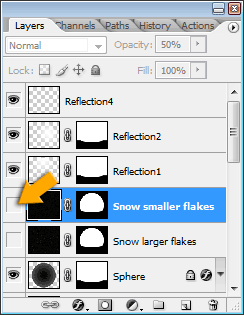
3.b When the action finishes turn off the visibility icons for the 2 snowflake layers (click the little eye-icon, on the left of the respective layer thumbnails):

3.c Flatten the image (Image > Flatten) and save it as panostest.jpg, replacing the default image which you decompressed earlier.
4. Run PicturestoExe. Select File > Open and navigate to the folder where you decompressed the 4 files. Open the panostest project. Click on PREVIEW to see the effect! Click on CREATE to save it. Simple as that!
I would like to thank Lin Evans for this great effect. For more information please read his detailed PDF tutorial.
I hope you enjoy the effect as much as I did.
3. One of these 4 files is called panostest.jpg. This is the flat (non-layered) product of my snow globe action. You will replace this image with your own. The steps which I am briefly discussing below are presented in detail in the PDF tutorial Lin created for us which you can download it here.
3.a Start by running my Snowglobe action (Snow globe - Version 2).
3.b When the action finishes turn off the visibility icons for the 2 snowflake layers (click the little eye-icon, on the left of the respective layer thumbnails):

3.c Flatten the image (Image > Flatten) and save it as panostest.jpg, replacing the default image which you decompressed earlier.
4. Run PicturestoExe. Select File > Open and navigate to the folder where you decompressed the 4 files. Open the panostest project. Click on PREVIEW to see the effect! Click on CREATE to save it. Simple as that!
I would like to thank Lin Evans for this great effect. For more information please read his detailed PDF tutorial.
I hope you enjoy the effect as much as I did.
Panos
