Introduction
You probably know that Photoshop CC & CS6 Extended let you create a 3D wine bottle from scratch. This feature remains rather neglected although it has more potential.
This tutorial will show you how to create a scene showing a bottle washed up in a shore, with a photo inside.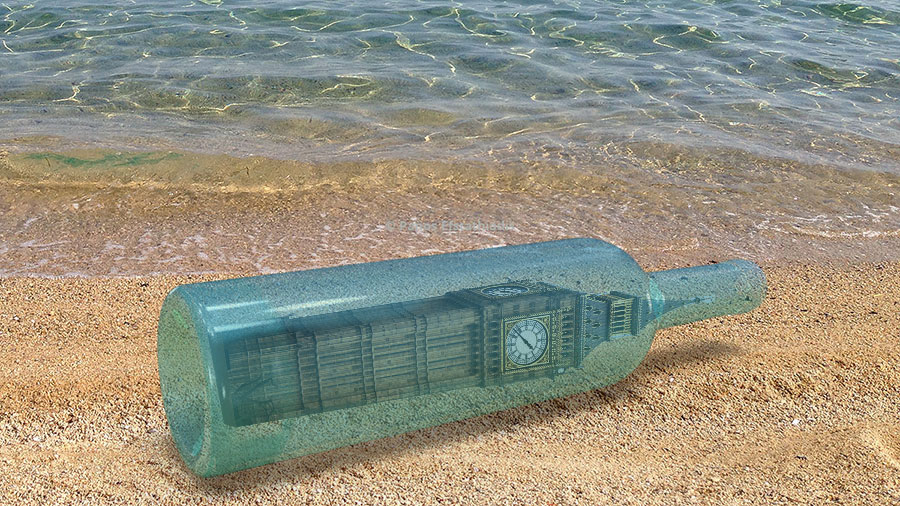
Click on the link below to load the 'seashore.jpg' image, which you may use on this tutorial. Alternatively you can use another similar image of your choice.
seashore.jpg
Creating the bottle
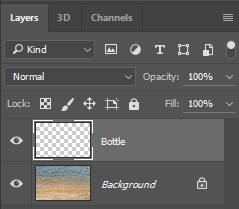
Press Shift-Ctrl-N (PC) or Shift-cmd-N (Mac) to create a new empty layer. Name this layer as "Bottle":
Select: 3D > New Mesh from Layer > Mesh Preset > Wine Bottle from the menu.
Select: 3D > Group All Objects in Scene
Switch to the 3D workspace, by selecting Window > Workspace > 3D
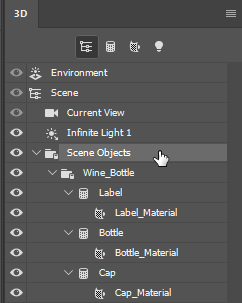
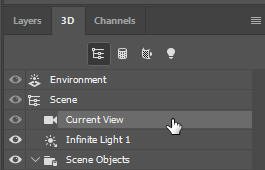
Go to the 3D Panel and click on "Scene Objects" (if it's not already selected):
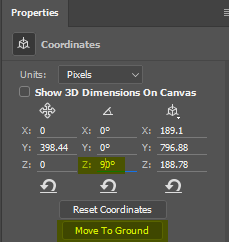
Go to the Properties panel (Window > Properties). Enter 90 degrees in the Z axis rotation field, to rotate the bottle and make it parallel to the ground.
Then click on the Move to Ground button:
Go to the 3D panel and click on "Current View":
Press V to select the move tool. Use the 3D tools in the options bar (below Photoshop's menu), to rotate / move the 3D bottle in the scene:
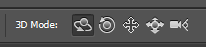
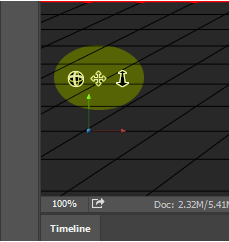
Alternatively you can use the 3D tools at the lower left corner of the work area:
Select: 3D > New Mesh from Layer > Mesh Preset > Wine Bottle from the menu.
Select: 3D > Group All Objects in Scene
Switch to the 3D workspace, by selecting Window > Workspace > 3D
Go to the 3D Panel and click on "Scene Objects" (if it's not already selected):
Go to the Properties panel (Window > Properties). Enter 90 degrees in the Z axis rotation field, to rotate the bottle and make it parallel to the ground.
Then click on the Move to Ground button:
Go to the 3D panel and click on "Current View":
Press V to select the move tool. Use the 3D tools in the options bar (below Photoshop's menu), to rotate / move the 3D bottle in the scene:
Alternatively you can use the 3D tools at the lower left corner of the work area:
Modifying the bottle
Go to the 3D panel. Click the eyeball icons to the left of "Label" and "Cap", to turn off these materials:
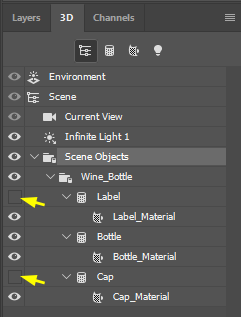
Click on Bottle_Material:

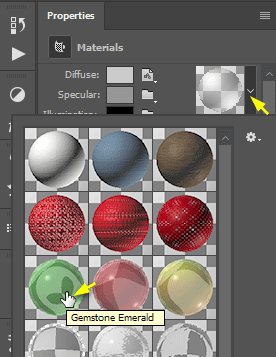
Go to the Properties panel. Click the material dropdown menu and select the Gemstone Emerald material, that looks like green glass:
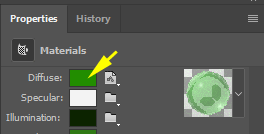
Let's change the color hue of the bottle. Click on the Diffuse color:
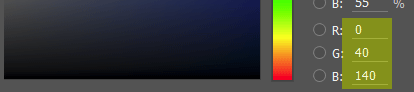
Then enter 0, 40, 140 in the R-G-B fields:
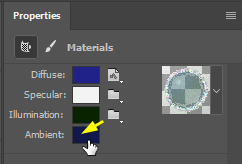
Then click on Ambient color and enter 0, 20, 70 in the R-G-B fields:
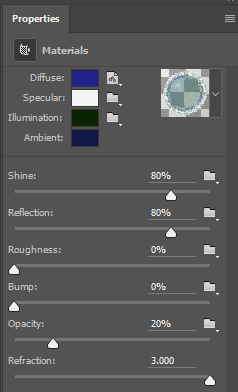
Finally move the sliders to set Shine and Reflection to 80%;
Reduce Roughness and Bump to 0%;
Set Opacity to 20% and Refraction to 3.000:
Click the little light bulb icon on the 3D panel:
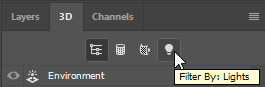
Use your mouse to redirect the 3D light source to your taste:
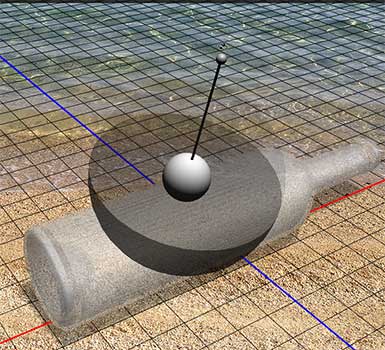
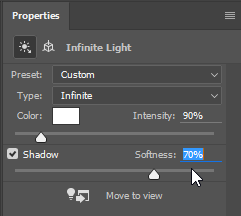
Go to the Properties panel and increase the Shadow softness to 70%
Click on Bottle_Material:
Go to the Properties panel. Click the material dropdown menu and select the Gemstone Emerald material, that looks like green glass:
Let's change the color hue of the bottle. Click on the Diffuse color:
Then enter 0, 40, 140 in the R-G-B fields:
Then click on Ambient color and enter 0, 20, 70 in the R-G-B fields:
Finally move the sliders to set Shine and Reflection to 80%;
Reduce Roughness and Bump to 0%;
Set Opacity to 20% and Refraction to 3.000:
Click the little light bulb icon on the 3D panel:
Use your mouse to redirect the 3D light source to your taste:
Go to the Properties panel and increase the Shadow softness to 70%
Rendering the 3D bottle
Now render the scene: Press Alt-Shift-Ctrl-R (PC) or opt-Shift-cmd-R (Mac).
Alternatively you can select 3D > Render 3D Layer from the menu, or click the Render button at the bottom of the 3D / Properties panels.
Rendering takes a while to complete. You can press the Esc key to stop it anytime. I recommend you wait for at least 7-10 minutes before you interrupt it.
When you are happy with the result, press the Esc key.
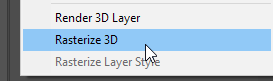
Let's rasterize the bottle. Go to the Layers panel, right click on the "Bottle" layer, and select "Rasterize 3D":
Alternatively, you can right click the "Bottle" layer and select "Convert to Smart Object".
Alternatively you can select 3D > Render 3D Layer from the menu, or click the Render button at the bottom of the 3D / Properties panels.
Rendering takes a while to complete. You can press the Esc key to stop it anytime. I recommend you wait for at least 7-10 minutes before you interrupt it.
When you are happy with the result, press the Esc key.
Let's rasterize the bottle. Go to the Layers panel, right click on the "Bottle" layer, and select "Rasterize 3D":
Alternatively, you can right click the "Bottle" layer and select "Convert to Smart Object".
Inserting a photo
Select the "Background" layer. Press Shift-Ctrl-N (PC) or Shift-cmd-N (Mac) to create a new empty layer. Name this layer as "Photo".
Select Edit > Place from the menu and insert a photo. Resize it so that it fits inside the bottle.
Click the "Bottle" layer and then add a layer mask.

Press B and pick a soft round brush.
Press D and then X to set black as the foreground color.
Press 4 to set the brush opacity to 40%.
Use the bracket keys [ ] to change the brush size.
Carefully paint over the mask, to reduce the glass opacity and reveal more details from the underlying photo layer.
Here's an example:
Select Edit > Place from the menu and insert a photo. Resize it so that it fits inside the bottle.
Click the "Bottle" layer and then add a layer mask.
Press B and pick a soft round brush.
Press D and then X to set black as the foreground color.
Press 4 to set the brush opacity to 40%.
Use the bracket keys [ ] to change the brush size.
Carefully paint over the mask, to reduce the glass opacity and reveal more details from the underlying photo layer.
Here's an example:
Creating the effect in Photoshop CS6 Extended
PS CS6 Extended users will also be able to create this effect. The result won't look exactly the same because some of the aforementioned 3D features and commands are missing in CS6 Extended:
The "Move to Ground" button is not available in the Properties panel in CS6 (it is shown in the 3rd image in my tutorial).
Instead you should select 3D > Snap Object to Ground Plane from the menu.
In CS6 you can't turn off the materials (as shown in the 7th image of my tutorial).
In addition, the glassy materials are not available in CS6 (9th image).
In CS6 you must click each one of the 3 materials that make up the 3D wine bottle (in the English Photoshop version they are named: Label_Material, Glass_Material, Cork_Material). Then, in the Properties panel you should lower the opacity of that material (e.g. to 20%) by moving the Opacity slider to the left.
The remaining steps of my tutorial are the same in CS6 (from the point where you change the Diffuse and Ambient colors).
Regards
Panos
