Working with vector graphics: create a badge
-
Photoshop CC, CS6
-
Advanced
This tutorial introduces you to Photoshop's vector graphics, demonstrating how to create a badge entirely with vectors. You'll explore creative uses of Photoshop's vector tools, including paths, shapes, and text, as well as techniques like clipping paths and text manipulation.
Completing the tutorial is worthwhile as you'll gain valuable skills applicable to various Photoshop projects.

Note: I created a Photoshop action that produces the same badge. You can download it by clicking here. Note that the layers produced by the action are different than the layers produced when you complete the tutorial: the purpose of this action is to show you how the final badge should look like.
STEP 1: PREPARING THE DOCUMENT:
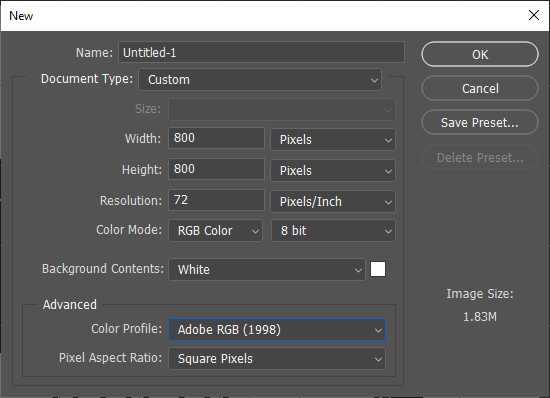
1.1. Select "File > New" and create a new document, 800 x 800 pixels:
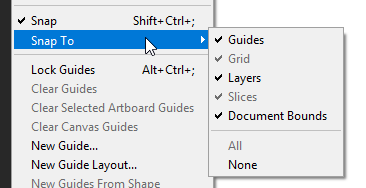
1.2. Click on "View" on the main menu; make sure that "Snap" is checked. Click on "Snap To" and make sure that all options are activated:
1.4. We will insert some guidelines that divide the document into 10 rows and 10 columns.
- PHOTOSHOP CC: Select “View > New Guide Layout” from the menu and use these settings:

- PHOTOSHOP CS6: The "New Guide Layout" command is missing in Photoshop CS6. To help CS6 users insert the guides quickly, I created an action that does the job for you. It's called "CS6: Insert 10x10 guides" and it's included in the free action set provided at the beginning of this tutorial. Download and decompress the zip file; load the action set in Photoshop and run the second action on the new document you created in step 1.1.
To hide / show the guides, press Ctrl+ ; (Mac: cmd+ ;) or check / uncheck the menu option: “View > Show > Guides”. We will use the guides at a later step, so you may hide them for now.
STEP 2: CREATE THE OUTER SHAPES:
2.1. Go to Photoshop's Toolbar, right click the Shape tool and select the Polygon Tool:

2.2. Move your mouse to the top of the work area; click the "Fill" color swatch and set the fill color to black:

2.3. Move your mouse a bit to the right; click the "Stroke" color swatch and set Stroke to “No Color” (indicated by a diagonal red line over the white color swatch):

2.4. Now click anywhere inside the document, to insert the shape (it doesn’t matter where exactly you click, because we will re-position the shape in the next step).
The “Create Polygon” dialogue box shows up. Enter these settings and hit OK:
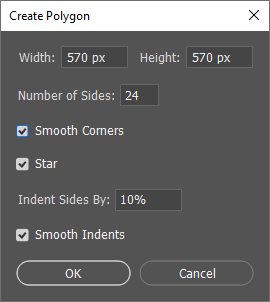
Note 3: You can ‘play’ with the settings in the “Create Polygon” dialogue box to create different badge shapes:

2.5. A new layer named “Polygon 1” has been created in the Layers panel. We will align it both horizontally and vertically with the background:
Hold down the Shift key and click the "Background" layer, to select both layers:

2.6. Select the menu command: “Layer > Align > Vertical Edges”
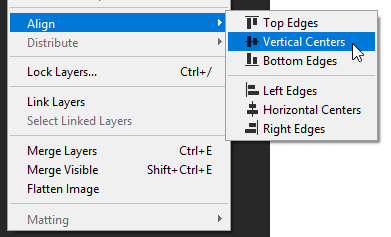
Now select the command: “Layer > Align > Horizontal Edges”
2.7. The polygon shape should now be centered over the background:

2.8. Press Shift+ Ctrl+ N (Mac: Shift+ cmd+ N) to create a new blank layer. Name it “White circle”:

2.9. Go to Photoshop's toolbar.
Right click the "Shape tool" and select the “Ellipse Tool”:
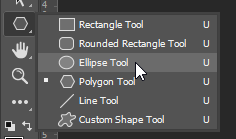
2.10. Move your mouse pointer to the tool's options bar (below the menu) and click the "Fill" color swatch.
This time set white as the fill color. Keep the “Stroke” color set to “No Color” (indicated by a diagonal red line over the white color swatch):

2.11. Move the mouse pointer a bit to the right; click the little gear icon and select “Circle (draw diameter or radius)”:

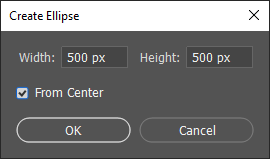
2.12. Click anywhere inside the document. The “Create Ellipse” dialogue box shows up. Enter 500px in both the "Width" and "Height" fields and hit OK:
2.13. Let’s center the white circle. Go to the layers panel. With the “White circle” layer selected, hold down the Shift key and click the “Background” layer. You should have selected all 3 layers:

2.14. Use the menu commands: “Layer > Align > Vertical Edges” and “Layer > Align > Horizontal Edges” to align the shapes (see step 2.6)
2.15. Select the “White Circle” layer. Press Ctrl+ J (Mac: cmd+ J) to duplicate it. Rename the new layer to “Black circle”.

Double click the "Black circle" layer thumbnail: the Color Picker window shows up. Pick the black color and hit OK.
2.16. Press Ctrl+ T (Mac: cmd+ T). Go to the top of the work area and set the Width and Height to 99%:

Hit the Enter key twice to confirm. Your document should look like this at this point:

STEP 3: CREATE A CIRCLE MADE OF SMALL CIRCLES
In this step, we'll craft a circular design composed of smaller circles. This versatile technique can be employed to fashion a wide range of intriguing design elements.
3.1. It’s time to use the guidelines that we created in step 1.4. Press Ctrl+ ; (Mac: cmd+ ;) to show them, or select “View > Show > Guides”.
At this point I would like to remind you of these handy keyboard shortcuts:
- Hold down Ctrl+ Space and click, to zoom in to the clicked point (Mac: cmd+ Space)
- Hold down Ctrl+ Alt+ Space and click, to zoom out (Mac: cmd+ option+ Space)
- Hold down the Space key and drag the mouse to pan over different parts of the document.
3.2. Press Shift+ Ctrl+ N (Mac: Shift+ cmd+ N) to create a new, blank layer. Name it “Circle of circles”:
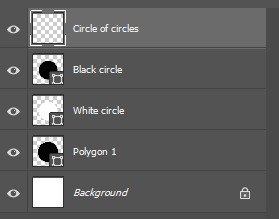
3.3. Zoom in to the top of the badge (I am reminding you of the keyboard shortcuts in step 3.1.):

3.4. Go to the toolbar and select the “Ellipse Tool”:

3.5. Move your mouse pointer to the top of the work area; click the "Fill" color swatch. Set White as the fill color. Leave “Stroke” set to “No Color”:

3.6. The mouse pointer should have a crosshair shape. Move the pointer at the top, exactly over the point where the 50% vertical guide crosses the 20% horizontal guide:

3.7. Click on that point. The “Create Ellipse” dialogue box shows up. Enter 4px in both the width and height fields, check the "From Center" box and hit OK:

The first circle has been added:

3.8. Now zoom to the bottom of the badge. You can hold down Space and drag the mouse so that you pan over the document.
Place the crosshair pointer exactly where the 50% vertical guide crosses the 80% horizontal guide:
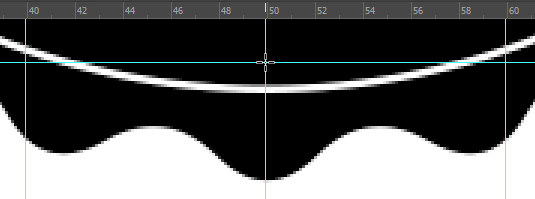
3.9. Click on that point. The “Create Ellipse” dialogue box shows up. Enter 4px in the width and height fields and hit OK.
The second circle has been added:

3.10. Go to the Layers panel. You’ll notice that a new layer named “Ellipse 1” has been created and is selected. Hold down the Shift key and click the “Circle of circles” layer, to select both layers:

3.11. Press Ctrl+ E (Mac: cmd+ E) to merge the two layers. Rename the new layer to “Circle of circles”.
3.12. Let's view the entire badge, as it looks so far.
- Press V to select the Move tool.
- Press Ctrl+ ; (Mac: cmd+ ;) to hide the guidelines.
- Press Ctrl+ 1 (Mac: cmd+ 1) to zoom to 1:1.
At this point the badge should look like this:

The Layers panel should look like this:

3.13. With the “Circle of circles” layer selected, press Ctrl+ T (mac: cmd+ T)
Go to the top of the work area and enter 2.5 in the transformation angle box (or 2,5 depending on your Photoshop language locale) :

Hit the Enter key twice to apply (or click the check-mark).
3.14. Now here comes the trick. Keep pressing Shift+ Ctrl+ Alt+ T (Mac: Shift+ cmd+ option+ T). Each time you press these 4 keys simultaneously, Photoshop will be adding 2 circles. Repeat as many times as needed to complete the big circle:

3.15. Go to the Layers panel. There you will find a host of new layers named “Circle of circles copy X” (where X is a number).
The first layer should be named “Circle of circles copy 71”:

3.16. With the “Circle of circles copy 71” layer selected, scroll down to the bottom of the layers’ stack.
Hold down Shift and click the “Circle of circles” layer. This will select all intermediate layers:
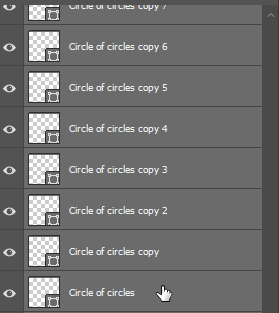
3.17. Press Ctrl+ E (Mac: cmd+ E) to merge the selected layers. Rename the merged layer to “Circle of circles”.
The Layers panel should now look like this:

STEP 4: CREATE THE INNER GRAPHICS:
4.1. Select the “Black circle” layer. Press Ctrl+ J (Mac: cmd+ J) to duplicate it. Rename the new layer to “White circle 2”.
4.2. Double click the “White circle 2” layer thumbnail to display the color picker. Set white as the fill color and hit OK.
4.3. Press Ctrl+ T (Mac: cmd+ T). Move your mouse at the top of the work area and enter 60% in the Width and Height fields.
Hit the Enter key twice to apply (or click the check-mark at the tool options bar).

The badge should now look like this:

4.4. Now we’ll create a white horizontal bar across the badge.
Go to the Layers panel and select the “Black circle” layer. Press Ctrl+ ; (Mac: cmd+ ;) to show the guides.
4.5. Go to the toolbar and select the “Rectangle Tool”:

4.6. Go to the top of the work area; click the "Fill" color swatch and set white as the fill color. Keep “Stroke” set to “No Color” (indicated by the diagonal red line over the white swatch):

4.7. Click and draw a rectangle that covers the area defined by the thick blue line in the screenshot below:

A new layer named “Rectangle 1” has been created.
4.8. Press Ctrl+ ; (cmd+ ;) to hide the guides.
Press Ctrl+ T (cmd+ T). Go to the top of the work area; enter 60% in the Height field (leave the Width field set to 100%) and press the Enter key twice to confirm:

Your badge should now look like this one:

4.9. Now we’ll create a clipping path.
Go to the layers panel and select the “Black circle” layer.
Press Ctrl+ J (cmd+ J) to duplicate it. Rename the new layer to “Black circle 2”.
Select the “Rectangle 1” layer and press Ctrl+ Alt+ G (Mac: cmd+ option+ G) to create the clipping mask. Observe the effect on the left and right edges of the “Rectangle 1” layer:

4.10. Select the “Black circle 2” layer. Press Ctrl+ T (cmd+ T). Go to the top of the work area; enter 94% in both the Width and Height fields and press the Enter key twice to confirm:

Observe how the reduction in the size of the “Black circle 2” layer affected the left and right edges of the “Rectangle 1” layer:

STEP 5: ADDING TEXT & OTHER CONTENT:
5.1. Press T to pick the Text tool. Go to the options bar (at the top of the work area), set black as the text color and choose the "Center Text" mode:

Type the text of your preference. Using an interesting font can make a big difference.
Aside from text, you can add one or more custom shapes of your choice, using the Custom Shape Tool:

5.2. In my example, I added two horizontal text layers ("artistic" and "COLLECTION") and a custom shape above them:

5.3. In the final part of this tutorial I will show you how to add two circular text layers. It’s slightly tricky to create a nice effect; I will try to be as much descriptive as possible.
Go to the Layers panel and select the “White circle 2” layer.
5.4. Make sure the "White circle 2" layer is selected. Go to the Paths panel (select: “Window > Path” if the panel is not visible).
There you will find a path named “White circle 2 Shape Path”.
Click and drag it on to the “Create new path” icon, at the bottom of the Paths panel:

5.5. A new path named “White circle 2 Shape Path copy” should now have been created in the Paths panel
(in Photoshop CS6 its name should be "Path 1":

We’ll use this path to add some text that follows the circular shape. But first we need to increase the size of the path.
Press Ctrl+ T (cmd+ T). Go to the top of the work area; enter 130% in both the Height & Width fields and press the Enter key twice to confirm:

5.6. Press T to select the Text tool.
Go to the options bar (at the top of the work area) and set the font color to white. Select a font of your preference, set its size between 10 to 30 points.
If you have Photoshop CS6, press Ctrl+ Shift+ N (cmd+ Shift+ N) to create a new, blank layer.
5.7. Move the mouse pointer at the top edge of the circular shape. The pointer should change its shape to a cursor imposed over a dotted curved line:

Click and start typing your text. When you finish, hit the Enter key to confirm. A new text layer has been created in the layers panel. Rename it to “Circular Text 1” and click the eyeball on the left of the layer name to temporarily turn off its visibility:

5.8. Now we’ll add some circular text near the bottom of the badge. Select the "White circle 2" layer.
Go to the Paths panel and duplicate the “White circle 2 Shape Path” path by dragging it on to the “Create new path” icon:

5.9. Press Ctrl+ T (cmd+ T). Go to the top of the work area; enter 140% in both the Width and Height fields and press the Enter key twice to confirm.
5.10. Press T to select the Text tool.
If you have Photoshop CS6, create press Ctrl+ Shift+ N (cmd+ Shift+ N) to create a new, blank layer.
5.11. This time move the pointer at the bottom of the circular shape and click to start typing. As you see, your text appears up-side down:

To fix this, go to the toolbar and select the “Path Selection Tool” (or press Shift+ A until you select the little black arrow):

Move the cursor over the text until the cursor shape changes into a double-headed arrow:

Click and drag the cursor upwards, until the text flows along the inner side of the circle:

5.11. Go to the Layers panel and rename this new text layer to “Circular Text 2”.
5.12. Finally, restore the visibility of the “Circular Text 1” layer, by clicking the eyeball to the left of the layer name.
That’s it. You should have created a badge that looks like this one. It's made up entirely of vector graphics. You can therefore change its size (press Ctrl+ Alt+ i or cmd+ option+ i) without losing any quality!

Congratulations on following patiently the tutorial steps!
You learned how to create your own badges! You also learned how to use vector graphics (paths and shapes) in Adobe Photoshop, how to use clipping paths, how to make text flow along shapes.
